Showing posts with label Gilly Lester. Show all posts

Monday, December 20, 2010

My Last Blog Post!

Hi, Today is my last Scrapware blog post, I have been a part of the Scrapware DT for over 1 1/2 years now, in that time I've made new friends and created some of my most favourite projects, I also received a  front cover of Scrapbook Creations this year.  In lots of ways I'm sad to be leaving and would like to thank Ange for having me as part of the Scrapware DT.
As my last post, I made a mini album called "A Day At The Beach" using October Afternoon
Seaside range and the ALB19 Allsorts Album
In which I made the arrow in the album into a beach hut. 
Love the little beach hut.
We found lots of little shells on the beach which I used to embellish the mini album.
Milly being a Sand Angel.
Making sandcastles.
Some more shells.
I love all the different sizes and shapes in this album.
 
And Here is some of my favourite LO's and Projects which I have created for Scrapware.
I think this is when I found Vintage Glitter glass and just fell in love with it.
Lost and Found My Mind's Eye.
Book of Me.
Shadow Boxes.
Front Cover LO, love this photo by Corrine Dany.
I wish this was full size and in my bedroom.
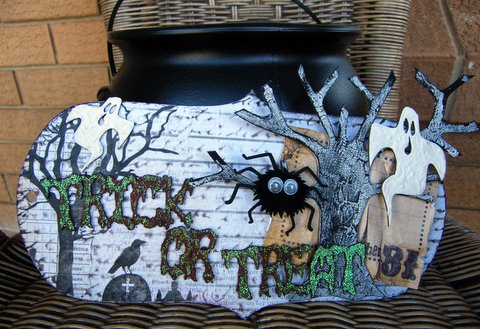
Halloween Mini Album
Dress Bunting made for Renee's birthday.
Another beautiful photo by Corrine.
6x6 Shadow Box which I made for Ange.
Thanks again Ange and The Scrapware DT,
 Gilly oxo

Wednesday, December 1, 2010

Technique Wednesday Making An Owl

Hi, Welcome to Technique Wednesday, A lot of people know I LOVE Owls and I just couldn't help myself when Ange sent me some more, I thought I would use one on a baby LO of my niece Mya.
So with the help of Renee we have filmed a tutorial on how to make a Owl come to life.
I used : CH375 Ollie Owls 1+2
CH392 Mini Banners
AZ10 Mini Antique Lowercase


hope you like it, and think it's a hoot!
Thanks Gilly ox

Friday, October 8, 2010

Hi, It's Flowery Friday which finishes our week of flowers on the Scrapware Blog.

My Daughter Milly just loves headbands but you can't always find the colours you want so I thought why not make my own and I received a beautiful handmade headband from a friend of mine like this so I gave it a go with my own spin to it.

I brought a white headband from spotlight, covered it in some vintage style lace and added these handmade flowers, which I did by putting the chipboard flowers through the Cuttlebug embossing machine, then painted them with pink paint, then white over the top, bend the petals into shape and put them together with some tulle in between the petals, then finished off the flowers with some Glimmer Mist and some clear crackle paint.


I used: LB29 Betty Blooms,


LB28 Kylie Blooms,


LB27 Marilyn Blooms.


My next project a made with a Memory Box I just love these box you can create your own little world in there, I keep finding yummy thing to add to it lol!


I used: KT44 10x10 Memory Box,


CH389 Garden Fence,


CH382 Natalie Frame Large.


I coated the frame in Liquid Pearls (white) and painted the fence in white paint, then a coat of white crackle paint, to finish I added some Kindy Glitz for alittle bling.


Wishing everyone a great weekend hope it's full of lots of scrapping!


Thanks Gilly ox

Monday, October 4, 2010

Flower and Bloom Week @Scrapware!

Hi, Welcome to a Flowers and Blooms week at The Scrapware Blog.

As it's well into Spring whats better than showcasing some of the talented Scrapware Girls Layouts and projects using beautiful blooms and who doesn't love flowers.

The great thing about the chipboard Blooms is you can make them any colour to match in which your layout or project, so no more having to have a big slash of flowers, you just need to have a couple of packs of the blooms on hand.

First up we have this lovely layout by our also lovely Nat May,

Nat spayed the Blooms and Do Hicky with Glimmer Mist, then ran the bloom through the Cuttlebug Machine which embossed it, Nat inked the title used an ink pad which are a great and quick way to colour the chipboard.


Nat used:


CH338 Do Hicky 4.


FL06 Flower Set 6


Next we have this gorgeous Layout by the equally gorgeous Taryn.
For the flowers and bird, Taryn has covered them in paper, which she first scrunched, and then applied using a few coats of modge podge, and to finish she inked the edges.

Taryn also used one of my favourite things vintage glitter glass on the swirls, which she also used on the alphas with a combination of ink, just beautiful!What a cute birdy!
Beautiful shabby chic flowers,And vintage glitter glass.Taryn used:


CH233 Bird Standing Large
CH404 Natalie Swirls
LB27 Marilyn Blooms
CH281 Blooms Small
AZ10 Mini antique alpha lowercase
MI07 Mini crown

Next we have this cute layout by the also cute Bridge.


Bridge ran her flowers through the cuttlebug machine to emboss them, then gave them a coat of bright coloured paint, which she tone down the edges a little by using an umber ink pad, to finish off the flowers she curled the petals which gave them a little dimension
Bridge also changed the shape of some of the flowers by cutting the petals through the middle.


Bridge used:
CH281 Blooms Small
MI12 Mini Stars
BD05 Border - Scallop, (used in reverse of the scallop for the top corner).


Next we have a beautiful show of Blooms by the creative Natalie Wolf.


Natalie created these beautiful bloom for the Scrapware Blog using different versions of the Marilyn and Kylie blooms, she sprayed them with Smooch Inks to add colour and Microbeads for the beautiful centres.
silver flower
pink flower
blue flower
The blooms can be used as awesome embellishments on a scrapbook layout or card.


Here is a card Natalie has created using one of the beautiful finished blooms.
<span class=
Natalie used:


LB28 Kylie Blooms,


LB27 Marilyn Blooms.


And last of all me and as I love doing Off The Page Projects, I thought I would make a open book, I haven't made one for awhile, but when I saw the new MME papers I couldn't help myself.
I inked the Do Hickey dark brown, and covered it in Dimensional Magic then coated it with vintage glitter glass.
The birdcage I inked in dark brown then covered it with 2 coats of brown glitter glue.
The bloom I sprayed with dark orange Glimmer Mist, then ran it through the Cuttlebug machine to emboss, then I inked over the embossing, bend the bloom into shape, to finish the bloom of I gave it a coat metallic paint and added a pearl brad.I used: LB28 Kylie Bloom,
CH337 Do Hickey 3,
CH344 Petite Flourish Birdcage
,
I added the pearls to match in with my photo.What a great start to the week and Hetty will be back on Wednesday with her wonderful technique can't wait to see that.


Thanks Gilly ox


Monday, September 13, 2010

A Little Shabby Chic


What a fabulous treat we have for you this week, with all things Shabby Chic, and so many beautiful creations from the Scrapware girls.

First up from Gilly we have the fabulously shabby "Own Little World"


Gilly put mod podge on the banners and covered it with an old music sheet, left it for 1 min, then pulled ther paper back off leaving some print behind, then inked around the edges and sewed a piece of lace on top to make the banner. Doesn't it look beautiful!!

The Do Hicky was sprayed with Glimmer Mist Chalkboard Hot chocolate, then covered in Cinnamon Stickles to add some bling.


With the alphas, Gilly inked them in light brown, then used clear crackle paint on top, going over again with a dark brown ink once the crackle paint was dry to create an aged look.


Gilly has used CH341 Do Hicky 7, CH392 Mini Banners, AZ08 Antique Lowercase Alphas.

Next up, from Hetty with her beautiful "Princess"...

What a pretty pretty layout, with all those pink flowers arranged perfectly around the raw chipboard.

Hetty has addded just a little texture by embossing the heart.

Hetty has used CH28 Tree Flourish Large, WD190 Princess Word, CH131 Flourish Shelley, and HS05 Primitive Heart.

And now check out this stunning piece from Trizzy.


Trizzy has used LB19 Flourish Frame and CH225 Twinchie Overlay B - both of which were painted with Antique white & Spearmint Kaiser Colour and highlighted with gold gilding wax. The corner of the overlay was given a few layers of white emossing powder, which was then stamped and highlighted as well.

Skeleton leaves were used and highlighted and tucked in under the image. Gold german scrap creates the beautiful border down the left, which was painted with white acrylic then embossed with holographic embossing powder. Some flat back pearls were added to the image to give her a necklace and matching earing - a girl must always where her jewels!

The word "Believe" was painted with black acrylic and highlighted with gold, and finally for the trim, Trizzy has threaded some beads onto head pins and attached them to some gold wire that was threaded through the bottom of the frame. Simply beautiful, Trizzy!

And how about this adorable layout from Nat May, a simple and pretty Layout using CH324 Antique Mini Frames and WD204 Angel (script).

Finally, I have created a boyish layout "Little Boy Blue" in a shabby chic style.


I have used some pale blue embossing powder and distress stickles, along with some pearls on my chandelier. For the large alphas, I have used some white ink and pale blue embossing powder, and for the mini alphas, I have inked them brown, and then embossed using a script stamp and the pale blue embossing powder.